Refining a 4-way open-baffle speaker with the miniDSP 2×4
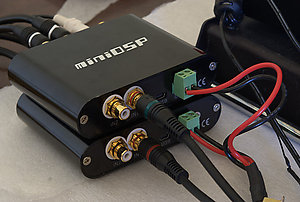 This is the second part of a tutorial on using the miniDSP for implementing an open-baffle loudspeaker. In the first part, I explained how to use a pair of miniDSP 2×4 crossover-equalizer units to build the first prototype. These diminutive units have won me over as a practical and affordable solution for all kinds of applications in an audio system. In this project, each channel uses one miniDSP as a four-way crossover, with three output channels driving amplification for the main open-baffle panel and the fourth output channel feeding a subwoofer.
Previously, I used a fairly rough-and-ready approach to get the speakers set up and basically working. I urged caution several times in order to ensure that the miniDSP settings and the wiring and connections were all done properly. I will assume that by now you’re comfortable with this fairly complex active system and the miniDSP user interface.
A little theory
Up until now, we’ve used in-room measurements – that is, measurements that include the response of the room as well as the loudspeaker. For loudspeaker design, though, we want to exclude the room effects by using a gated measurement.
In Figure 1 below, I’ve drawn a loudspeaker and a measurement microphone from the side. A signal generated by the loudspeaker will be first received by the microphone along the direct path A. Shortly afterwards, the microphone will receive another signal – the reflection from the floor – along path B. Then the microphone will see a reflection off the ceiling, via path C. And so on; reflections upon reflections will then result.
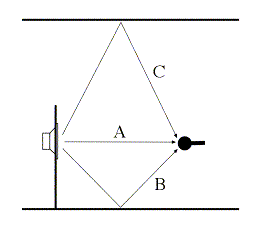
Figure 1. Typical measurement setup
The time-domain behavior or a room and/or loudspeaker system is typically characterized by its impulse response: the response of the system to a very short burst of energy – or impulse – that is input to the speaker. A loudspeaker cannot reproduce an impulse exactly, but instead, its impulse response typically looks like a peak with some wobbles before it and a lot of wobbles after it. Figure 2 shows an example of a speaker’s impulse response at A; this is followed by reflections at B, C, and so on.
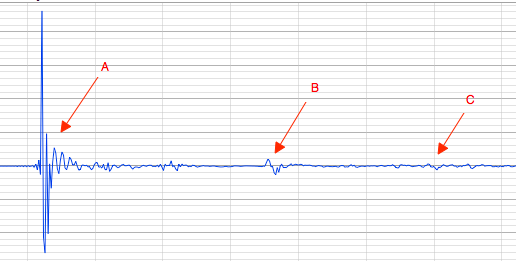
Figure 2. Real example of impulse response of speaker and room
(There is an additional complication in our case: since we are measuring an open-baffle speaker, there is also an impulse arriving at the microphone from the driver’s rear radiation. For practical purposes, we’ll just assume that there is a single impulse from each driver.)
So, to determine the response of the speaker without the room, we need to do away with the reflections B, C, and so on. The brute-force approach is to use an anechoic chamber – a room without reflections. A more feasible approach for most of us is to simply remove the reflections from the measurement data, by cutting off the signal just before the first reflection and thus leaving just the speaker’s impulse response – this is called a gated measurement.
Once the time-domain signal is gated, it can be converted back into the frequency domain, with the result being the frequency response of the speaker, without any room effects! The limitation of this method is that it works only down to a certain frequency, determined by the length of the gate. If the gate length is T seconds, then the lowest frequency we can measure is 1/T Hz – in practice, I figure on perhaps twice that.
At sea-level, the speed of sound is 340 meters/second. With the microphone a meter from the speaker driver, the sound will take 1/340 = 0.0029411 seconds to travel this distance, or about 3 ms (milliseconds). If the driver and microphone are a meter off the ground, the length of path B will be 2.24 meters, so the first reflection will be seen after 2.24/340 = 6.6 ms. The difference is 3.6 ms, and this is is the maximum T we can use for our gate, so the lowest frequency we can measure is 1/0.0036 or 275 Hz.
To reduce this frequency, we need to move the driver being measured further away from any reflecting surfaces. In my case, the best I can do indoors is 1.2 meters, as my ceilings are 2.4 meters high – in other words, I will raise the speaker off the floor so the driver being measured is halfway between the floor and the ceiling. To do better, I would have to take the speaker outside and raise it as far off the ground as possible, and away from any walls, trees, and so on. This in turn brings its own issues with noise – wind, traffic, or birds and insects.
Overall approach
Given the limitations on low-frequency resolution outlined above, the approach I am going to take in this article is to use in-room measurements for the subwoofer and woofer, and gated measurements for the midrange and tweeter. While not ideal, it’s a practical solution for a DIYer.
Refer again to the block diagram of the miniDSP four-way crossover, in Figure 3. The blocks Parametric EQ Output 1 through to Parametric EQ Output 4 will be used to equalize the response of each driver: the subwoofer, woofer, midrange, and tweeter, in that order. Each block has six parametric filters that can each be used as a peak/notch filter, a low-shelf filter, or a high-shelf filter.
We will then adjust the crossover settings using the 4-way Crossover block.
The overall Parametric EQ block can then be used for overall response tailoring if you wish.
Measurements and equalization
In the following sections, I will measure and equalize each driver in turn. Connect your measurement equipment to one miniDSP only. (See Subwoofer equalization and integration with the miniDSP 2×4 for information on connecting up the measurement system.) I start with the right channel, but it makes no difference which one you do first. I also feed my measurement signal through my preamp, but you can also feed it directly into the miniDSP as long as you have a way to adjust the volume.
As you do each driver, go to the Delay/Gain/RMS blocks and mute all channels except the one being measured. Figure 4 shows an example with the midrange channel being muted. (These screenshots looks slightly different from earlier articles, as the miniDSP plugins have recently been upgraded, which included some small-but-worthwhile usability enhancements.)
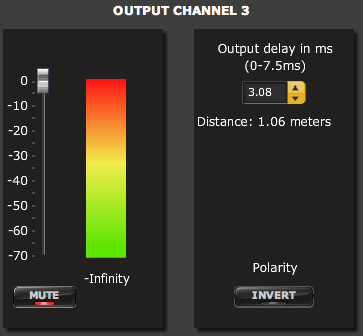
Figure 4. Midrange channel disabled
Also, in the 4-way Crossover block, disable the crossover filters for the channel being measured by using the Bypass buttons, as shown in Figure 5. This is so that we can measure the driver without any effects from the crossover.
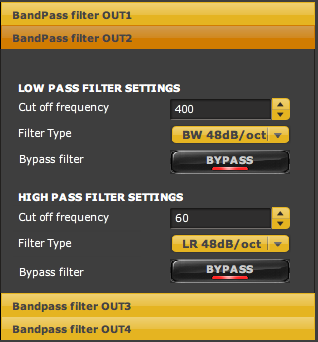
Figure 5. Woofer channel with crossover filter disabled
In your measuring program, set your measurement sweep frequencies to sensible values – there is no point running the subwoofer sweep up to 20 kHz, and it’s probably inadvisable to sweep a tweeter from 10 Hz!
Subwoofer
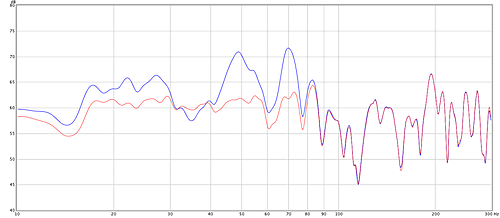
The measurement and equalization procedure for the subwoofer is as described in Subwoofer Integration and Equalization with the miniDSP 2×4, so I won’t repeat it here. I used two notch filters and one boost filter to flatten the response between 20 and 60 Hz. I then used two more notch filters to flatten the response more on either side of this band – perhaps not really necessary but I had the filters spare anyway.
Figure 6 shows the response before (blue) and after (red) equalization. (Click on the image for a larger version.)
Woofer
For the woofer, I firstly made a series of in-room measurements at and around the listening position. Since this is a “solo” listening seat, the measurement positions were the nominal listening position, 30 cm to the left and right, 25 cm forward, 20 cm back, 15 cm up, and 10 cm down. It’s not necessary to do this for every measurement, but I think it’s worth doing as a check once or twice, to make sure that you are not attempting to compensate for something that is an issue at only one point in space.
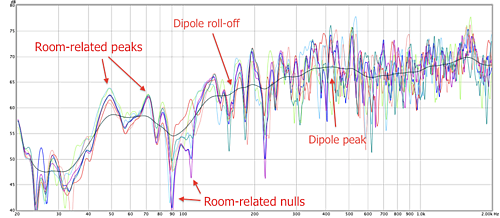
I then used Room Eq Wizard (REW) to generate an average measurement. This is done by clicking on the “All SPL” button, and then on the “Average Responses” button on the lower left of that display. A new measurement is created, which is the average. Figure 7 shows the set of unsmoothed measurements, overlaid with the average response in black, with 1/3-octave smoothing used on the latter. You can see evidence of the dipole peak at a little over 400 Hz, and a roughly 6 dB/octave rolloff below that. The room swamps this response at lower frequencies, with peaks at 49 and 71 Hz, and nulls in the 90-105 Hz region.
To equalize this response, I started with filters for the two key features mentioned above: the dipole peak and the dipole rolloff. For the dipole peak, I used a fairly broad notch filter at 400 Hz, with a Q of 2 and a gain of -3 dB. For the dipole rolloff, I used a high-shelf filter with a gain of -10 dB and a center frequency of 200 Hz. The settings for this filter are shown in Figure 8 below.

Figure 8. High-shelf filter settings for dipole woofer
I remeasured with these filters on, to confirm that I was on the right track, and then switched to an unsmoothed curve and added notch filters to deal with the main peaks in the response. I also (with some trepidation) added a boost at 90 Hz to deal with the dip in that region. As usual, there is interaction between the various filters, and some adjustment of the filters for the dipole peak and rolloff was needed during this process.
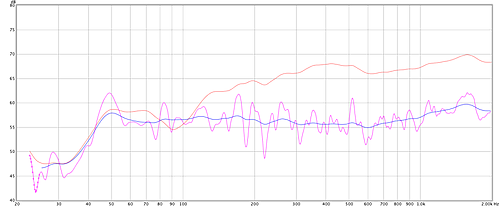
Figure 9 shows the final woofer response unsmoothed (purple) and with 1/3-octave smoothing (blue). These are again an average of seven measurements at different points in space. The unequalized response (with 1/3-octave smoothing) is shown in red for comparison.
Figure 10 shows the equalization curve used to get this result – you can see the high-shelf filter and the notch filter that compensate for the dipole roll-off and the dipole peak.

Figure 10. Woofer equalization curve
Midrange
As per the discussion above, I elevated the speaker off the floor (on bricks) so that the midrange driver was approximately 1.2m off the floor. This should give me, in theory, a first-reflection time of 7.6 ms. Since the direct signal will take 3 ms to travel a meter to the microphone, we should expect to see the first reflection at around (7.6 – 3) = 4.6 ms after the direct signal.
To perform the gated measurements, I used FuzzMeasure Pro. This is not a free program, but it’s not terribly expensive either and there’s a trial download. I use it because I generally do my measurements on a Mac laptop, but if you have Windows you can try HOLMImpulse, which is free.
I ran the sweep from 100 Hz to 10 kHz. FuzzMeasure Pro initially shows a very long impulse (several hundred milliseconds), so using the graphical controls, I set up a gate of a few milliseconds, as shown in Figure 11. The white area is the signal that is used to generate the frequency response, and the grey area is the signal that is gated out and thus will have no effect on the frequency response.
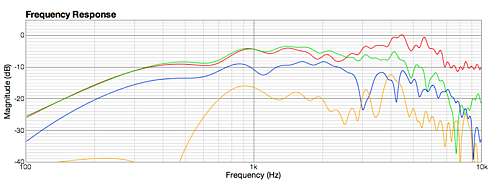
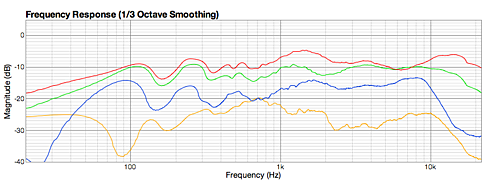
The corresponding frequency response is shown in red in Figure 12. I also measured the response in 30-degree increments around the speaker: at 30 degrees (green), 60 degrees (blue), and 90 degrees (orange). As you can see, there is a reasonable “null” at the 90 degree position, as we want in a dipole speaker.
Based on this measurement, a small amount of equalization is needed on the midrange driver. Similarly to the woofer, I applied a broad notch at 1000 Hz to compensate for the dipole peak, and a shelving filter to compensate for the dipole rolloff. These filters were much more gentle than needed on the woofer. I also applied a fairly narrow notch at 4300 Hz, to compensate for a peak caused by the driver ringing. The result (for 0, 30, 60 and 90 degrees) is shown in Figure 13.
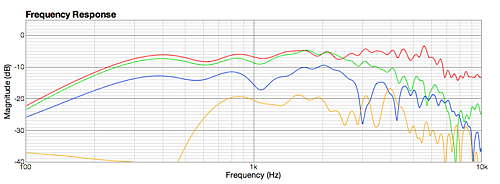
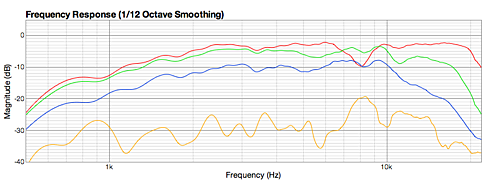
It is helpful to also examine the frequency response to the rear of the baffle. Figure 14 shows the response at 180 (red), 150 (green), 120 (blue), and (again, in orange) 90 degrees. These responses are after EQ has been applied. As you can see, the frequency response of the rear radiation is quite different from the front – after all, this driver was not designed as a dipole driver! Nonetheless, we can consider it to be operating as a dipole up to a bit over 2 kHz.
Tweeter
I adjusted the speaker height again to get the tweeter as close to 1.2 m off the floor as I could, and ran a series of sweep measurements from 500 Hz to 22 kHz. The frequency response is shown in Figure 15 at 0 (red), 30 (green), 60 (blue) and 90 (orange) degrees. As you can see, there is a problem… a dip at 8 kHz in the on-axis measurement. I suspect this is due to the mounting structure around the tweeter – this is something that I will need to correct in a future version of the baffle.
Based on these curves, I applied a small amount of equalization to the tweeter. There is nothing I can do about the 8 kHz notch at this point, so I left that alone. I applied a high-shelf filter to bring up the very top end – while in theory I can’t hear it, I’ve found that in practice some EQ like this does make this tweeter sound more extended and “open.” I also applied a small amount of shelving at the lower end of the range to flatten the response down to 2.5 kHz, in anticipation of possibly moving the crossover point lower than the current 4 kHz. Figure 16 shows the result, again for 0, 30, 60 and 90 degrees.
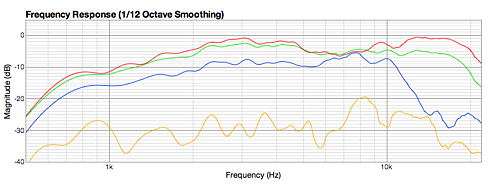
Looking at the frequency response around the rear of the baffle, we find that the radiation pattern is much better behaved for the tweeter than the midrange, except for that area around 7-8 kHz.. This suggests to me that, for full dipole operation, a planar midrange driver might have been a better choice than a cone. See Figure 17.
Putting it all together
Armed with these more detailed measurements and a reasonably flat response for each driver within its passband, we can now revisit the crossover settings. But first, let’s time-align the drivers.
Time-alignment of drivers
You’ve probably seen speakers with a tilted-back baffle, advertised as being necessary for “time alignment” of the drivers. This is a more complex subject than simply getting the drivers’ acoustic centers on a vertical plane, but we can if we wish perform this kind of alignment digitally. Since the miniDSP has a time delay on each output channel, we can use that to effectively place the drivers on the same acoustic plane. (Note: this is effective only for the front radiation. I’m going to assume that getting it right out front is most important, and we will see how it looks out back once we’re all done.)
There are various ways of working out what to set the time delays to, but here’s a fairly quick and simple technique:
- Pick a pair of drivers, and place the microphone vertically mid-way between the centers of the drivers, and about a meter away.
- Turn off all channels except those two.
- Turn off the crossover filters for those two drivers.
- Set one driver to have a short (1 to a few ms, depending on the drivers) time delay.
- Run a sweep over a frequency range that is covered by both drivers.
- Look at the impulse response to determine how much the drivers differ from the specified time delay.
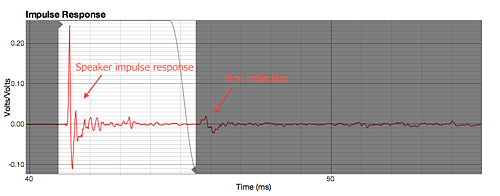
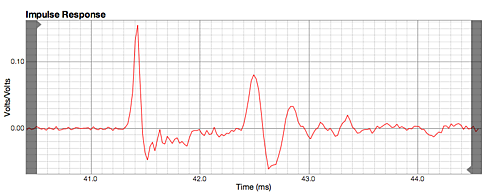
For example, I did the above for the woofer and the midrange driver, running the sweep from 500 Hz to 1 kHz. The impulse response is shown in Figure 18 below. (You may wish to click on the image to see a larger version.) I delayed the woofer by 1 ms, so its impulse (the second one) should be exactly 1 ms later than the impulse from the mid, if it were acoustically time-aligned. However, I can see from the graph that it is actually delayed slightly more than that – I figure by 0.08 ms. So, the midrange driver needs to be delayed by 0.08 ms relative to the woofer.
Doing the above for each pair of drivers, I get the following:
- The woofer is delayed by 3 ms with respect to the subwoofer.
- The mid is delayed by 0.08 ms with respect to the woofer, for a total of 3.08 ms.
- The tweeter is delayed by 0.02 ms with respect to the mid, for a total of 3.1 ms.
In the miniDSP interface, I set channels 2 through 4 to have the delays indicated. The interface conveniently tells you the physical distance the delay corresponds to; or, you can calculate it as Distance = Delay in ms x 0.34. So, the equivalent distance from the sub to the woofer is 3 x 0.34 = 1.02 meters – which makes sense, as I put the sub about a meter behind the main baffle. The delay from woofer to midrange corresponds to a distance of 2.7 cm, and from the mid to the tweeter, 0.7 cm. These distances seem to match well with the physical structure of the drivers, confirming that the measured delays seem reasonable.
Crossover settings
We can now redo the crossover settings. I started with the midrange-tweeter crossover. Ideally, we would like to place the crossover frequency at the point where the dispersion pattern of the two drivers is similar – that is, where the off-axis measurements meet. This should then result in a smooth off-axis response across the range of the two drivers. From examining the graphs, I chose a frequency of 2.5 kHz for the mid-tweeter crossover. I used, by default, a Linkwitz-Riley 8th-order (48 dB/octave) slope.
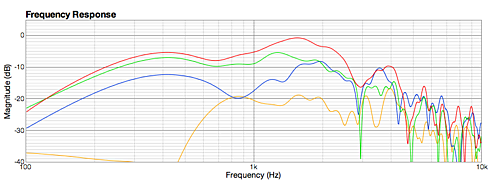
For the woofer-mid crossover, I started with the 400 Hz crossover from the earlier prototype, but ended up moving it up to 800 Hz to get the smoothest off-axis response at 30 and 60 degrees. Figure 20 shows the response of the woofer, mid, and tweeter at 0 (red), 30 (green), 60 (blue) and 90 (orange) degrees. Note that these measurements do include some room effects, as I used a gate time of 15 ms in order to get a response at woofer frequencies. I’d say that this looks pretty good, with a reasonably-smooth off-axis response across the range. In future work, the response could perhaps be improved in the 2-3 kHz range (around the crossover frequency) and in the 7-8 kHz area (the presumed tweeter mounting issue).
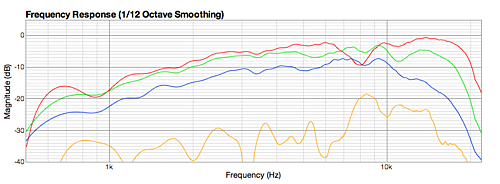
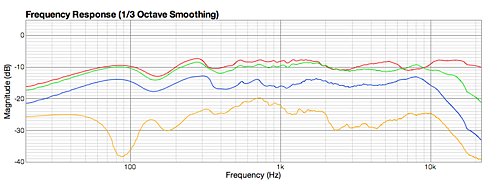
For completeness, Figure 20 shows the response at the rear of the panel at 180, 150, 120 and 90 degrees. Not as good, but nonetheless exhibiting reasonable dipole behavior over most of the frequency range.
Gain adjustments
Now is also the time that you will be needing to adjust the levels of each channel. You can do this directly in the miniDSP interface, as I showed in the first part of this tutorial. If, however, you have a large gain difference, you might prefer to use an attenuator at the input to the relevant power amp. This helps to maximize the signal-to-noise ratio coming out of the D/A convertors. Some “integrated” amps are really just a power amp with an attenuator on the input, or you can wire up an attenuator at the power amp input, or make a small “passive” volume control with short flying leads out of it. Figure 21 illustrates the complete system with attenuators on the tweeter and mid channels.
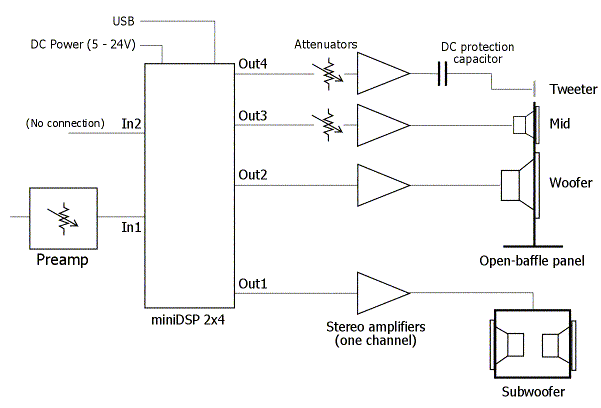
Figure 21. Complete 4-way system with analog attenuators
A first-order crossover
While I had the measurement gear out and the panel raised up off the floor, I decided to set up a version of the crossover using first-order (6 dB/octave) slopes as well. But why? As we know, the advantage of the high-order crossover is that there is much less overlap between the drivers. At each crossover point, the high-order crossover will result in less strain on the “upper” driver, as it is not being asked to reproduce lower frequencies; and furthermore, there is less likelihood of problem frequencies from the “lower” driver (such as resonance peaks) being audible. The reduced overlap between drivers also reduces issues with interference between the drivers in the vertical axis.
Figure 22 is the screenshot of the high-order crossover curves – while there is some overlap between drivers, it’s relatively minimal.
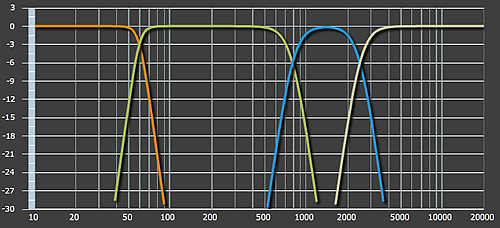
Figure 22. High-order crossover slopes
The “downside” of the steeper crossover slopes is that they have a large phase shift around the crossover frequency. The first-order crossover, however, has no phase shift in the summed response from the two drivers – if considered at the ideal position in space. As a result, the impulse response of a first-order crossover is (in theory) much closer to the ideal impulse. So let’s try it and see.
At this point, make sure that you save the current miniDSP configuration to a file – called, say, “High order open baffle.xml.” After changing all of the crossover slopes, you will of course want to save that as a different configuration – “First order open baffle.xml.” Then you can switch between them relatively easily later on, to audition the two different sets of crossovers.
Having saved the miniDSP configuration to a file, I switched all of the crossover filters except the subwoofer lowpass filter to first-order (6 dB/octave Butterworth). Integrating the drivers using first-order slopes is more work than the high-order crossover and and requires additional tailoring of the equalization filters, due to the overlap between drivers. The level over the whole middle of the frequency range will also be higher – because of the driver overlap – so shelving filters at the bottom (woofer) and top (tweeter) need to be adjusted accordingly. I also moved the tweeter crossover point back up to 3500 Hz to reduce strain on the tweeter.
Figure 23 shows the resulting slopes using first-order crossovers (except for the subwoofer lowpass filter). You can see how much more overlap there is between the drivers.
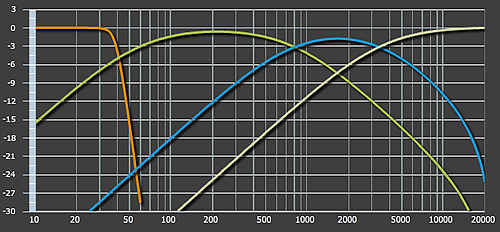
Figure 23. First-order crossover slopes
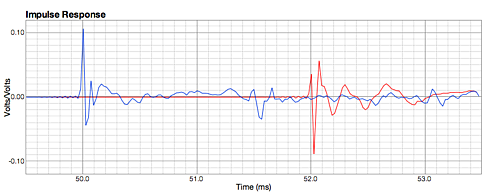
So how does the impulse response look? Figure 24 shows the impulse response of the main panel only (no subwoofer), with the first-order crossover in blue, and the high-order crossover in red. (The latter is shifted in time only to make it easier to see.) Look at the first millisecond or so of each; notice how the impulse response of the first-order crossover is “tighter” and has less “ringing”? Is this audible? Try it for yourself and see!
Note: the phase shift mentioned above is something inherent to crossover filters, it’s not a specific issue with digital crossovers – passive crossovers made with inductors and capacitors have exactly the same issue. Some high-end digital crossovers, such as the DEQX, are able to implement linear phase filters – which are more computationally-intensive and require more memory – and thus avoid these types of phase issues, provided they are implemented correctly.
Adding in the sub
Finally, the sub is added back into the mix. This must be done using in-room measurements, and with the main panel back in the regular position. I did this separately for the high-order and first-order crossovers.
In general, adding in subs can be tricky. In my case, I had positioned each sub about a meter behind the main open-baffle panel, which makes things easier than using a single sub located some distance from both speakers. For the high-order crossover, the only change that I made was to switch from a Linkwitz-Riley 48 dB/octave slope to a 48 dB/octave Butterworth slope – this nicely filled in a bit of a dip I was getting at the 60 Hz crossover frequency. The first-order crossover was a little more work – I ended up moving the subwoofer low-pass filter down to 40 Hz and using the output channel settings for delay and phase inversion to get the flattest response.
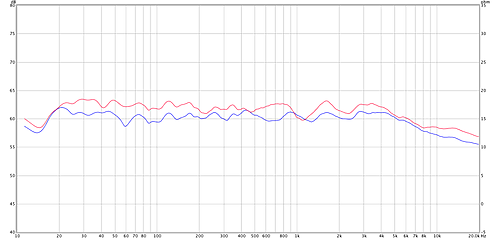
After all that, my final in-room measurements for both sets of crossovers are shown in Figure 25, with the first-order in red and the high-order in blue.
Getting back to the music!
It’s now a simple matter of ensuring that the current miniDSP configuration is saved to a file, and then disconnecting the USB cable from the right channel miniDSP and connecting it to the left-channel miniDSP. After performing a Sync, both channels will be processing identically, and you can listen to music!
Concluding remarks
As I mentioned in the introduction to this article, I’m rather pleased with the miniDSP. For minimal cost, a whole world of experimentation is now open to anyone willing to put in a bit of effort. For my part, I’m certainly enjoying the learning experience as I write this series of articles.
And, after years of thinking about it, it’s wonderful to finally have a “large” speaker in the house. The beauty of open-baffle speakers is that you can start to get that type of effortless “large speaker” sound without having to have a large (and heavy) pair of boxes in the room.
I’m far from done, though. This speaker is still a prototype, and there is lots more to do. For example, while the incorporation of a pair of sealed subwoofers does lead to a very solid bottom end, I also wonder if I’ve lost a little of the “tunefulness” of open-baffle bass. In Part 3 of this series, I will replace the sealed subwoofers with open-baffle subwoofers. I have the drivers lined up already, and an extra power amp waiting in the wings.
See you soon.
Acknowledgements
I’d very much like to thank the following people who reviewed and helped improve this article prior to publication: Nyal Mellor of Acoustic Frontiers, Paul Spencer, and Bob Walters of the Bay Area Audiophile Society.



Congratulations and thank you for sharing your experiences. I am in the same path and ideas. Looking forward to know more of your experiences. Regards.
Thanks for a great set of articles. There’s an abundance of information about passive crossover/eq design, but I have found very little on active crossover/eq design. So as an enthusiastic owner of a miniDSP I was happily surprised to stumble upon your very informative and well-written articles. Thanks for helping to put the fun of “DIY” back into audio.
I would like to suggest a follow-on article using one of the new “advanced” miniDSP plugins that integrate with Room EQ Wizard (REW). You could repeat one of your projects (sub or 4-way) using the auto equalization features and compare the results with your previous “manual” solutions.
Waiting for more,
Ed
Hi Ed, thank you for the comment. My reservation with the auto-eq is primarily that the transfer from REW to miniDSP is done with raw bi-quad coefficients. So if you subsequently want to “tweak” a filter, you have to get REW involved again – you can’t just change filter settings directly in the miniDSP interface.
You can also make gated measurements with REW, the REW “IR Windows” controls let you set any desired gating and choose your preferred window shapes. The windows can be shown on the Impulse graph.
Nice job on the article, by the way 🙂
Thank you John, for the comment and information. I’ll look into the IR Windows in REW – I hope you don’t mind if I email with a question or two if needed.
These posts about the mini-dsp are very good and have convinced me to try it out. I currently run an active setup but with analog crossover and passive components for baffle step correction inside my mains and am looking forward to such a fine level of control.
James – go for it, it’s too much fun 🙂 🙂 (writing articles is a bit of work though – phew)