Active speakers with Pure Music and FabFilter Pro-Q: a Primer
Of the music players available for the Mac, Pure Music stands out as the one with the most comprehensive feature set. One of those features is its active crossover, which can be used to implement an active speaker system of up to four ways. Combining the music player and the active crossover in this way has some key advantages – it takes advantage of CPU power that’s already there on your music computer, and it’s able to use high-precision floating-point arithmetic for the filter calculations, ensuring minimal processing artifacts added to the signal.
The crossover fulfils one of two key processing functions in an active speaker, that of “splitting” the signal into frequency bands for the various loudspeaker drivers (tweeter, woofer, subwoofer, in this article). The other key function is equalization. Few loudspeaker drivers are perfectly “flat,” so equalization (or response shaping, if you prefer) is essential if you want an accurate loudspeaker. Pure Music does not have equalization built-in but it does support plugins, so I’ll use FabFilter Pro-Q.
In this tutorial, I’ll be setting up a two-way speaker with a single subwoofer. This configuration demonstrates all of the key points without being unnecessarily complex. I’ll assume that you’re already familiar with playing music on the Mac and have a library set up (if not, see my Getting Started guide), and have learned how to use Pure Music for regular two-channel playback.
System configuration
Figure 1 shows the overall system configuration. Internally to the computer, Pure Music is responsible for playback of the music file and for the crossover itself, while the FabFilter Pro-Q plugin is used to equalize each crossover output. I’ve also shown a “global EQ” Pro-Q block before the crossover, which will be used to provide overall response shaping.
The music computer is connected to a multi-channel DAC via USB or FireWire. The DAC outputs are connected to stereo amplifiers for the woofers and tweeters, and to the subwoofer amp. A capacitor between the power amp and the tweeters is shown to protect the tweeter—optional but recommended unless you are certain that your amps are well-behaved enough and/or your tweeters are robust enough to withstand any turn-on or turn-off “thumps.”
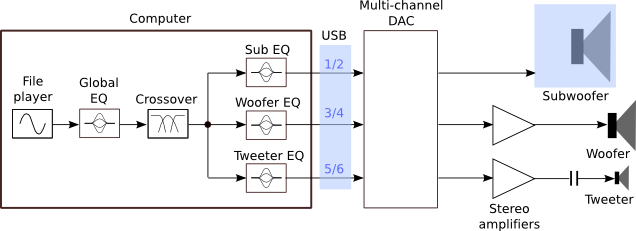
Figure 1. Active system configuration with Pure Music and FabFilter Pro-Q
The multi-channel DAC is a potential stumbling block. While there are plenty available, they are mostly in the “pro” audio world—designed for use in music production environments and so not well-known to 2-channel hifi enthusiasts. If you’re looking for something on a budget to learn and experiment with, the MOTU Microbook II fits the bill. For a more permanent setup, Oliver Masciarotte recommends the Metric Halo LIO-8 and the Universal Audio Apollo for their high quality and reasonable (for the performance obtained) price. You can find other candidates on the Pure Music Supported Soundcards page.
Once you have the multichannel DAC plugged into the Mac, you can check its configuration in the Audio MIDI Setup application (you’ll find it in Applications/Utilities). Selecting the device will show the available channels, like this:
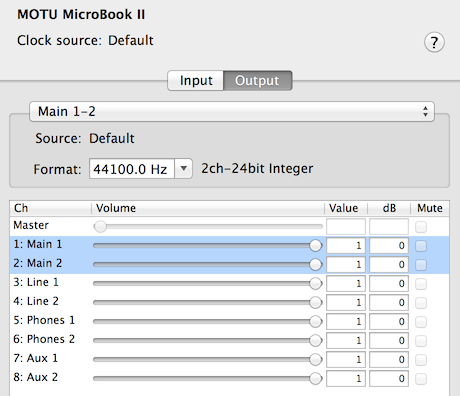
Typically, these devices have additional channels to the DAC outputs. In this example, the first six channels go to the DAC, while the last two (“Aux”) are sent to an internal mixer; in other devices, separate channels are used for S/PDIF output; others may have ADAT outputs; and so on.
Basic setup
I’ll assume that you’ve managed to get your hardware connected as shown in Figure 1. In this section, I’ll go through the steps needed to configure the crossover in Pure Music. The result at this point will not be optimal, but it will get us started. Note: make sure all of your amplification is turned off while making these settings… and by the way, if this is the first time you’re doing something like this, I do recommend using inexpensive equipment to “learn the ropes,” as otherwise a mistake could prove costly.
Open Pure Music preferences, and go to Audio Settings → Multichannel → Setup. Near the bottom you will see the label “Quick Crossover” and a series of buttons; press the L/M/H button. The result should look like this:
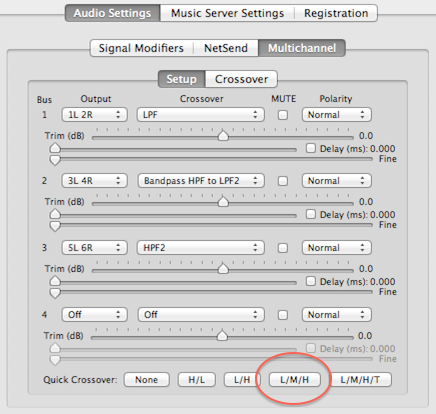
You can see that different output pairs (“1L 2R” etc) have been assigned to the low pass, band pass (mid), and high pass outputs. If these default assignments aren’t right for your setup, you can change them with the drop-down selectors. There are also controls here to adjust the gain and delay of each channel—these will be used later when fine-tuning the crossover.
Now go to Preferences → Audio Settings → Multichannel → Crossover → LPF/HFP. This is where we set up the crossover between the subwoofer and the woofers. This is a typical starting point:
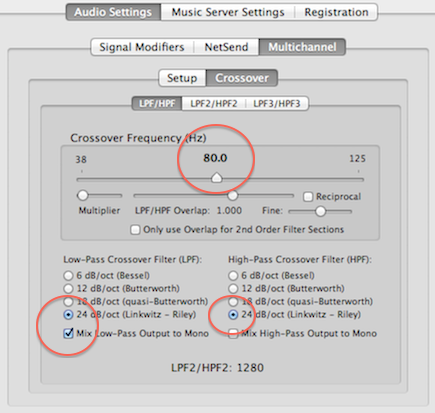
Important items to note here are:
- The crossover frequency is set to 80 Hz
- The crossover type for both low pass (subwoofer) and high pass (woofer) is set to 24 dB/oct
- The box “Mix Low-Pass Output to Mono” is checked
This last item is, of course, because in this system we have a single subwoofer. If you had “stereo subs,” you would leave this unchecked.
Now let’s set up the crossover between the woofers and tweeters. Go to Preferences → Audio Settings → Multichannel → Crossover → LPF2/HFP2 and set the crossover frequency to suit your drivers. If needed, use the “Multiplier” slider to get the main adjustment slider into the correct frequency range. At this point, also make sure that the Overlap control is set to 1.0. I would recommend starting with 24 db/octave crossover filters for both low pass and high pass. You may wish to change these later, but I suspect you will find 24 dB/octave easiest to use—6 dB/octave has a lot of interaction between the drivers over a broad range; 12 dB/octave will tend to produce a peak at the crossover frequency; and 18 dB/octave will tend to produce a dip.
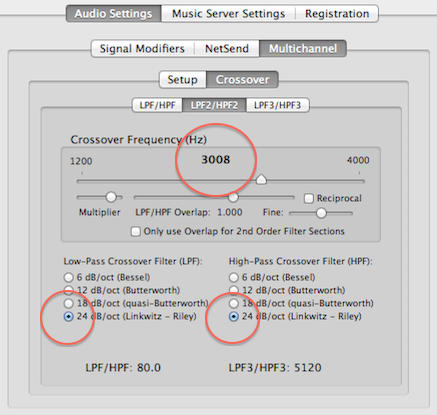
You can ignore the LPF3/HPF3 tab, as the fourth output is not used.
Well, that’s the initial setup done! You should now check that each output channel is doing what you expect. Turn the volume all the way down, then turn on the subwoofer amp. Start playing a file with lots of bass in it and slowly turn up the volume—you should be able to hear the sub. Repeat the process with the woofers and then the tweeters, making sure to turn down the volume each time. If at any time something doesn’t sound right, stop and figure out the problem before proceeding.
If all went well for the “smoke test,” then you can turn on all amps and play some music. Chances are, it won’t sound great, because we have yet to correct the raw driver responses and the different amp gains and driver sensitivities will have some drivers playing too loud while others are too soft. You can, if you wish, use the Multichannel Setup screen to adjust the gains of each channel as best as you can by ear… or just proceed to the next section where the drivers will be measured and the gains properly calibrated.
Measuring and integrating the drivers
To proceed further, you will need to perform acoustic measurement of your speaker drivers. All loudspeakers, including those with passive crossovers, have some measure of response shaping aka equalization built into them, and so that’s what we’re going to do—digitally—in this section.
Getting set up for measurement
You’ll need a measurement microphone like the Cross Spectrum-calibrated EMM-6 and a USB measurement interface such as the Focusrite Scarlett 2i2 or MOTU Microbook II. You’ll also need a measurement program, such as FuzzMeasure Pro or Room EQ Wizard.
You will need to install the Pure Music Playthrough Audio Device, or PAD, which will allow the measurement program to feed its output through Pure Music. Go to Audio Setup → Device Selection → Input and Playthrough and click on “Install…”
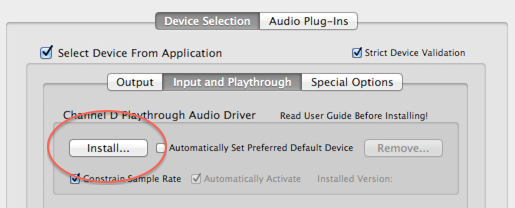
Once installed, the “Channel D PAD” will show up as an audio output device in places such as the System Preferences Sound pane and in the Audio MIDI Setup utility. The measurement program needs to be set to output audio to this virtual device. FuzzMeasure Pro can do this directly:
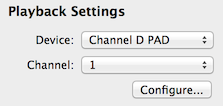
If you’re using REW, you will need to set REW to output to the System default device, and set the System output device to the Channel D PAD. And if you’re using REW with a soundcard with multiple input pairs or with a FireWire soundcard, you may need to use my REW input workaround.
Put Pure Music into playthrough mode by selecting Audio Playthrough from the Music Server menu. I always turn off upsampling and memory play first. A note of caution here: until you are used to how your hardware behaves, I would recommend always turning off all amplification whenever doing this with a microphone connected, as at least some audio interfaces (Presonus Firebox, for example) will route inputs straight through to the outputs at this time, resulting in a horrendous and potentially speaker-damaging feedback loop.
With that done, you can turn on (say) the woofer amplifiers and check that a measurement sweep produces sound. If not, you will need to stop and debug before proceeding.
Installing the EQ
I’ll be using FabFilter Pro-Q for equalization. This is an AU (Audio Unit) plugin with an excellent user interface and sound quality. Once installed, go to Pure Music’s Audio Setup → Audio Plug-Ins screen and set up four copies of FabFilter Pro-Q, as shown here:
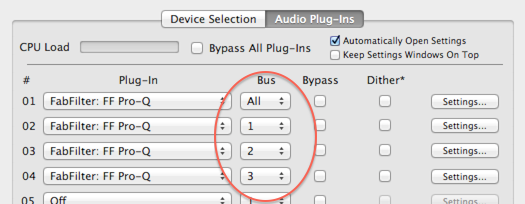
The first instance operates on all channels, and will be used for global EQ adjustments. Each of the following three operate on one output channel each and will be used to equalize the subwoofer, woofers, and tweeters respectively. You may prefer to uncheck the “Automatically Open Settings” button, as with it on, Pure Music opens all four Pro-Q windows each time you open the plugins screen.
Measuring and equalizing the main drivers
It’s now necessary to measure each driver individually and use EQ to adjust its response. For the subwoofer we will do an in-room measurement, but for the woofer and tweeter we should try, as far as possible, to perform a “quasi anechoic” measurement so that the response of only the driver and enclosure (without the room) is being corrected. Note: we do these measurements on a single speaker only.
Ideally, these measurements are done outdoors, with the speaker elevated off the ground and as far away from other reflecting surfaces as possible. If measurements must be done indoors, place the speaker as far as possible from walls and other reflecting surfaces and angled relative to the walls. Raise the speaker so the tweeter is halfway between the ceiling and floor, and place the microphone level with the tweeter and a meter away.
Before measuring each driver, adjust the crossover point in Pure Music so that at least an octave past the intended crossover point is being measured. The other drivers can be muted in the Multichannel Setup screen. With the tweeter measurement, gating can be used in the measurement program to remove reflections, but with the woofer, it’s unavoidable that reflections will be present so you’ll need to be careful not to inadvertently correct for room effects at this point. Doing a gated measurement at the higher frequencies covered by the woofer may be helpful.
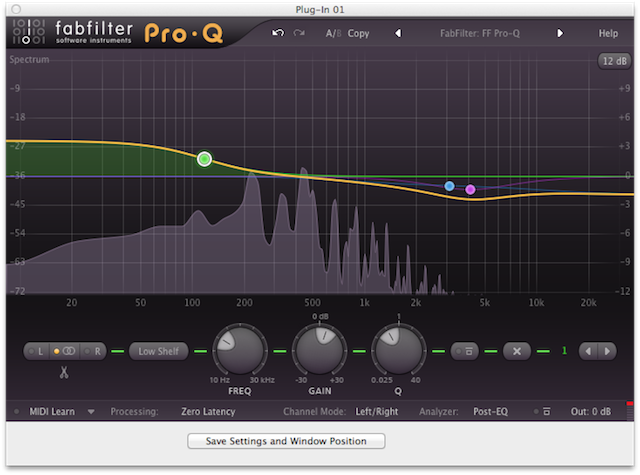
Once you have a measurement, you will then need to use Pro-Q to correct the response of the driver so that – within reason – the response is flat well beyond the intended crossover point. Figure 2, for example, shows the correction curve of the woofer: a shelving filter for baffle step compensation, and a broad notch to correct for cabinet diffraction.
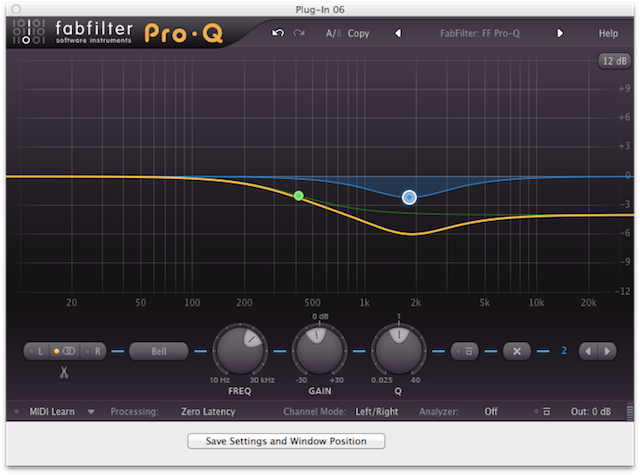
Figure 2. Woofer EQ with Fabfilter Pro-Q
The Pro-Q interface shown above is very easy to use: drag on the response line to create a new EQ point and move the point around for center frequency and gain. Q is adjusted with a dial underneath the response plot. Creating a new EQ point near the top or bottom of the frequency range creates a shelving filter (high or low, respectively), and any EQ point can be changed using the type selector near the bottom left of the control panel (shown as “Bell” in the screenshot).
One of the interesting features of FabFilter Pro-Q is that it supports linear-phase filtering as well as conventional minimum-phase filtering. In Pro-Q, the latter is called “zero-latency” filtering, and this selection is shown bottom left-of-center in the above screenshot. If you experiment with the linear-phase filtering options, make sure that all three output EQ blocks have the same setting. I’ll be exploring Pro-Q’s linear-phase filtering in detail in a followup article.
(By the way: make sure that you press that “Save Settings and Window Position” button before closing the Pro-Q window, or your work will be lost!)
Figure 3 shows the woofer response before and after equalization. This driver doesn’t have any objectionable peaks in the response, but if yours does, you may want to notch them out. Avoid using boost to correct dips in the response, though, and don’t “over-correct”! Even with this outdoor measurement, the peak at 150 Hz and those dips at 210 and 510 Hz, for example, are most likely caused by reflections and are not intrinsic to the driver.
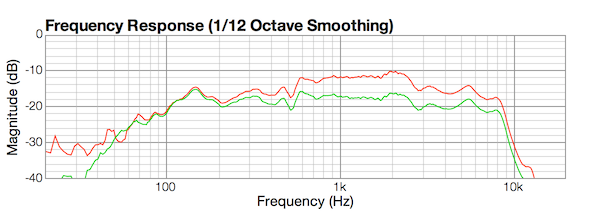
Figure 3. Woofer response before (red) and after (green) EQ
Integrating the drivers
Obtaining a flat response throughout the crossover region is something of an art, although DSP makes it much easier than using passive components—I think so anyway. I’ve found that a fairly reliable way to get a good result is to equalize the drivers flat to an octave past the crossover point, with delay on one to “time align” them if there is any appreciable physical offset. With a reasonably steep crossover (e.g. 24 dB/octave), this is generally very close to optimum without much further tweaking needed.
To integrate the two drivers, you will most likely need to adjust the gain of one or other in the Settings pane. You should always adjust the gain down, unless you are very sure of what you are doing and have a good reason to increase gain. This ensures that you won’t run into issues with clipping the output on any channel.
The lower curves in Figure 4 show the responses of the woofer and tweeter in the example system with the crossover frequency set back to the target 3 kHz. The upper curve shows the result when both drivers are measured together.
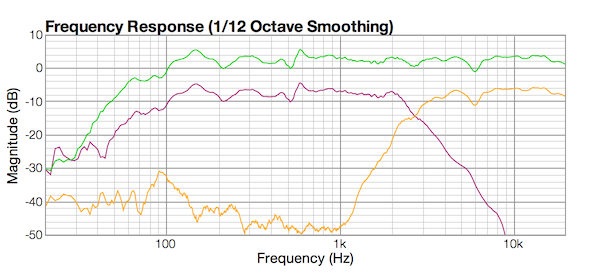
Figure 4. Woofer and tweeter responses with EQ and crossover
In some cases, the approach above is not feasible, in which case the driver response will need to be taken into account instead of just equalized out—by using, for example, a different slope on the high pass and low pass. Regardless of approach, some tweaking around the crossover point may still be needed to get a flat response, and the Overlap control in the Pure Music crossover settings can help with this.
Equalizing and integrating the subwoofer
The subwoofer is measured with the microphone at the listening position. Truely optimizing subwoofer integration can be a fairly involved process, and for a thorough treatment I highly recommend you read and follow Paul Spencer’s Bass Integration Guide. Here, I will just do a basic setup to illustrate the use of Pure Music and FabFilter Pro-Q.
With the lower crossover point set to 1 kHz, I ran a sweep of the subwoofer. Equalizing the subwoofer meant using three notches to mitigate the effect of room modes, and a low-frequency shelf to boost the lows a little for this sealed sub. Figure 5 shows the before and after plots of the sub.
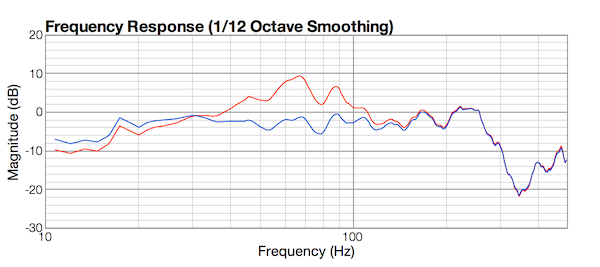
Figure 5. Subwoofer before (red) and after (blue) EQ
With the mains in the intended listening position, it is now a matter of integrating the subwoofer and the mains to obtain the smoothest response at and around the crossover frequency. At these frequencies, a simple crossover often does not work and some experimentation will be needed, as well as the use of the delay adjustment. Since the woofer on this speaker rolls off naturally at around 90-100 Hz, I used a 12 dB/octave highpass on the woofer (to result in a total 24 dB/octave slope) and a 24 dB/octave lowpass on the subwoofer set to 90 Hz. To get the best response, I used an overlap of 1.15. Figure 6 shows the resulting in-room response.
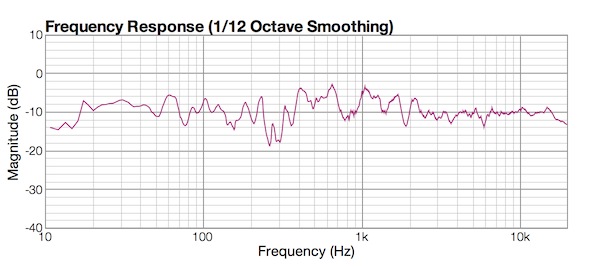
Figure 6. Fullrange in-room response
Listening and global adjustments
With all that done, you can connect up the second speaker, set Pure Music back to Audio File Player mode, and play some music!
Earlier, I created an instance of FabFilter Pro-Q that operates on all channels. This can be used for EQ adjustments that apply across the whole frequency band, rather than to individual drivers as we did above. One use for this is notching out problematic room modes and “room correction.” But there are some other uses you may like to try, which can be done by ear:
- A target curve boost in the bass (see the Bass Integration Guide)
- A gentle high shelf if the in-room sound ends up being a little bright
- A “BBC dip” to push the soundstage a little further back
None of these are required, but are indicative of possibilities you can try that, with an off-the-shelf speaker, have already been “voiced” into the speaker.
Limitations
Running your active crossover in-computer has, as noted in the introduction, some key advantages. For one thing, since you already have the computer there is plenty of processing power on tap without the need to purchase units with dedicated digital signal processors in them. For another, the wordlength and therefore resolution is likely higher than dedicated DSPs, and potentially, so is the flexibility from being able to distribute and update software for a general-purpose computer.
There are some limitations, though. Pure Music is designed for playing from computer files, and playing from other sources is more difficult. If you have a vinyl source, then digitizing your collection with Pure Vinyl would certainly be one approach. It is possible to route other digital sources on the computer through Pure Music using the PAD (as described above for measurement), and I use this for things like streaming from GrooveShark.
The crossover is also limited in some features compared to dedicated digital crossovers. For example, the number of different types of crossover filter is limited to four, whereas off-the-shelf digital crossovers offer a dozen or more. Another limitation is that there is no way to save multiple configurations, to allow rapid switching for auditioning changes, or to have different settings for e.g. normal listening and late-night listening.
Concluding remarks
For the audiophile with a dedicated Mac-based playback system, the Pure Music crossover, in conjunction with a high-quality EQ like FabFilter Pro-Q, offers a remarkably easy way to set up an active speaker system. While the example in this article is a conventional 2-way plus sub, it can be used with more complex or esoteric systems. I’ve used it successfully for my three-way dipole panel with dipole subwoofer, for example.
If you’re a Mac-based computer audiophile, I’d highly recommend exploring Pure Music’s active crossover capability. If you’re unsure, both Pure Music and FabFilter Pro-Q have free trial periods. And if you’re interested in learning more about plugins and the possibilities they afford, do check out Oliver Masciarotte’s companion article Plugins for Audiophile Music Players, also in this issue.
Acknowledgements
HifiZine gratefully acknowledges the support of:
- Super-Mega Ultra-Groovy, for the use of Fuzz-Measure Pro
- Channel D, for the use of Pure Music
- FabFilter, for the use of Pro-Q


Hi,
Thanks for the article. This may make me sound like a luddite but the USB connection you picture in the first diagram: Do I need three USBs for the three channels or do the three streams go to the multichannel DAC on the one USB link?
Also in this model I gather all volume control is with the pure music/itunes combo on my MAC.
Finally do you know any multichannel ladder DACs out there.
Any help appreciated.
Mark
Hi Mark, you’re welcome! There is a single USB connection to a multi-channel DAC, and all channels are multiplexed onto that one connection.
Yes, you would most likely do volume control with Pure Music. I believe some of the multichannel DACs do have a master volume control.
I don’t have an answer to the multi-channel ladder DAC question, I’m afraid! Please let us know if you find any.