Bass Integration Guide – Part 2
This article is the second of a three-part series on bass integration, covering all major aspects of accurate bass reproduction in domestic listening rooms. In Part 1, certain performance targets were presented along with instructions on how to measure the current bass performance. In almost all instances, the targets won’t be met and the shortfall will be significant. Acoustic treatment is introduced in this article as the first step towards improving bass performance, because it deals with the related acoustic problems at their source.
Is acoustic treatment really necessary?
Acoustic treatment is essential if accurate bass reproduction is the goal. It’s often argued that the use of EQ or multiple subwoofers can replace acoustic treatment. In most cases, those will be required in addition to treatment. This guide is written for those who want the best possible performance. Imagine going to an exclusive restaurant and ordering only dessert. One who wants to enjoy the full experience doesn’t weigh up the pros and cons of dessert versus an appetizer.
It is very easy to recognize an overly live room with excessive reflections and flutter echo, but in the bass range, acoustic problems are more difficult to identify by ear. Our auditory processing does not easily distinguish between the bass source and the effects of the room itself. Often a subwoofer will be blamed for poor performance, when in reality the problems heard are actually coming from the room. As a result, the need for treatment is frequently overlooked.
Bass traps are more commonly seen in exclusive high-end dedicated listening rooms that have been professionally designed. Most of the equipment in these exotic rooms is beyond reach for those not so well-heeled, but the bass performance of these systems is one aspect that the average audio enthusiast can obtain without an excessive price tag.
In Part 1, I mentioned how the room dominates the sound below about 200 Hz in domestic rooms. The primary cause of this is room modes, which cause large swings in bass response as well as modal ringing where the energy of some frequencies take much longer to decay. The result is seen in both frequency and time domain measurements. Subjectively, the bass may sound boomy or absent and in some cases both may occur at the same time. Common solutions include plugging ports, turning down subwoofers, or excluding them completely. This does not fix the underlying acoustic problems, but merely hides them. Many audiophiles learn to accept less bass, but often don’t realize the extent to which music is diminished in the process. This guide is intended to help audio enthusiasts rediscover bass.
Understanding your measurements
Here is one example of a room without treatment:
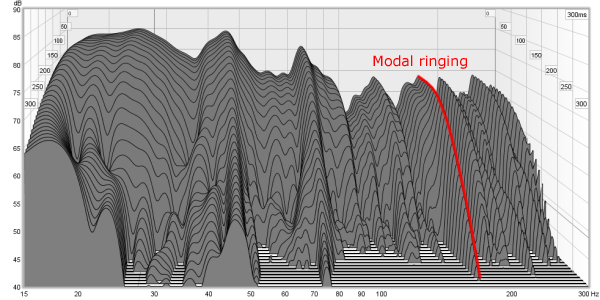
Figure 1. Waterfall plot of an untreated room
The main thing to recognize in this waterfall plot is the variation in decay rates. You can see that certain frequencies are ringing with a high-Q tail. This is highlighted as a red line. You can see that either side of this point, the bass decays much quicker. This is an indication that the room is not providing enough bass absorption. The highlighted 180 Hz peak is also clearly visible in the 2D decay plot in Figure 2.
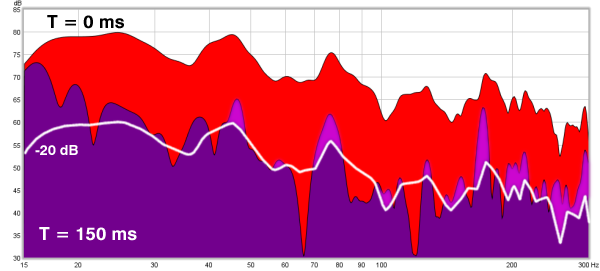
Figure 2. 2D decay plot of an untreated room
The areas shaded magenta highlight problem areas where the decay exceeds the target. You can see that, in this room, additional absorption across the entire range is needed. We are less concerned with the decay below 40 Hz, and extreme solutions to achieve effective absorption down this low aren’t warranted.
For more information on these plots:
Recall that in Part 1, performance targets were mentioned. Of particular interest is the decay target, indicated by the white line in Figure 2. The requirement is for 20 dB of decay at 150 ms above 40 Hz where a 300 ms window time has been chosen.
Bass damping
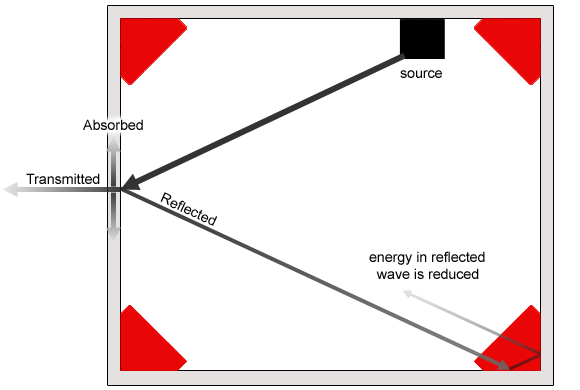
Figure 3 shows the way in which the room envelope and bass traps work together to provide bass damping. The room envelope can be considered the enclosing boundaries that are seen by bass sound waves. If listening occurs in a larger open-plan space, then the envelope may be much larger than the area designated as the listening room.
Consider an acoustic sound wave, which is reflected, absorbed and transmitted when it hits a room boundary. A heavy concrete envelope will tend to reduce transmission and absorption, resulting in a large proportion of the energy being reflected back into the room. This causes substantial problems and a room like this requires extra attention. A more typical room construction that includes light timber framing and plasterboard (drywall) lining performs better due to the reduced reflection and the increased absorption and transmission. Bass traps are shown in red. These add further bass absorption and ensure that this absorption is spread over the required bandwidth.
Please note: the diagram in Figure 3 is highly simplified to illustrate the effects of absorption, reflection and transmission in a room. In reality the sound waves in the bass range travel in all directions simultaneously.
To read more about the importance of room damping:
Narrow and broadband absorption
A room envelope typically provides narrowband absorption. It acts as a resonant system, and the absorption and transmission varies greatly with frequency. This is why virtually all rooms require added bass traps to ensure broadband absorption. Helmholtz resonators and membrane traps are narrowband devices. If they are the only type of bass traps used, then it’s important to ensure that they cover 40 – 200 Hz. This means having traps that are tuned at different points to cover the range when combined.
Resistive porous traps provide broadband absorption. Their upper limit of effectiveness is determined by the properties of the material, and the depth of the device determines the lower limit. Where possible, broadband traps should be used.
The appeal of membrane traps is that they can be much less obtrusive. Ideally they should be used to add to broadband traps, but in some cases membrane traps may be a more practical solution.
Room modification
Enclosing boundaries that are heavy and stiff – such as concrete or masonry – cause bass problems that are substantially worse than typical listening rooms. Difficult rooms require more careful attention. If your room is lightly constructed, you can move on to step two. External brick veneer walls don’t pose a problem. A concrete slab requires no attention unless the ceiling is also concrete, in which case the ceiling should be addressed as shown in Figure 4. (Images from The Soundproofing Company.)
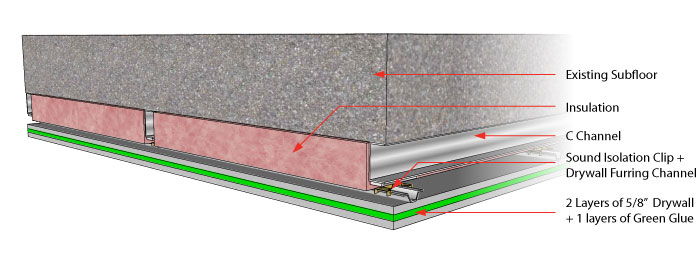
Figure 4. Suggested modification to concrete ceilings
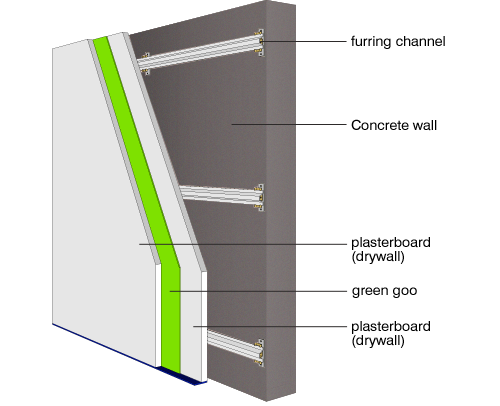
Figure 5. Suggested modification to masonry or concrete walls
It should be noted that sound isolation is a different requirement and is not covered in this article. Contrary to what one might expect, sound isolation at low frequencies suffers a little when a solid wall is modified as shown due to resonances in the air space. This is called the triple leaf effect.
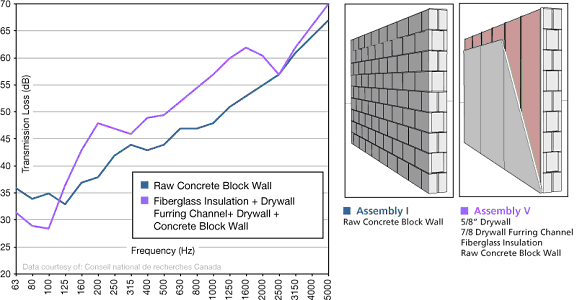
Figure 6. The impact on sound isolation
This compromise is necessary where bass quality is the primary focus. The sound isolation can be improved further, but the expense is significant and the construction involved beyond the scope of this article. For more information, see:
The anatomy of a bass trap
A broadband trap is the simplest type. This is the principal trap recommended in this guide. It consists of a porous yet dense material such as rigid fiberglass, typically 100 – 150mm in depth. The fiberglass is the only material needed for it to work acoustically, but a frame is normally included and the material is wrapped in fabric to contain the glass fibers. Many traps have a membrane that reflects the midrange while allowing bass to pass through, where extra mid and high frequency absorption aren’t desired. Without this layer, resistive traps can cause a room to sound dead. Broadband traps are most effective when the distance to the boundary is one-quarter wavelength of the frequency in question, but they are effective at lower frequencies than this would suggest. Broadband traps can also be called resistive traps.
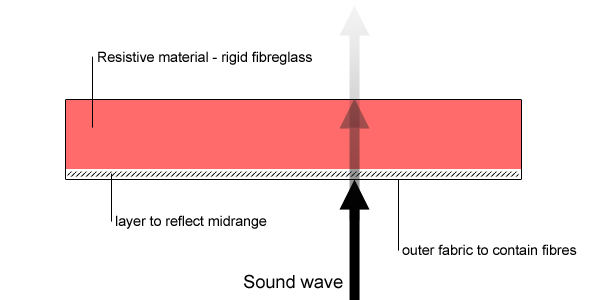
Figure 7. Broadband bass traps
Membrane traps are not quite as simple and there are many variations. Most designs include a box with a membrane on the front and a thin panel of rigid fiberglass inside, which increases the bandwidth. Some are completely sealed, while others have a perforated membrane.
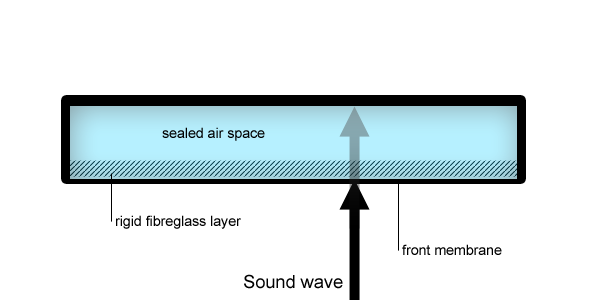
Figure 8. Membrane traps
While broadband traps are simple to design and construct, membrane traps are more difficult and many of the details are critical. Factors such as the precise sizing of the holes (if used) or the thickness of the sides of the box can have a substantial impact. Before constructing such a trap, it is recommended to read the BBC research papers referenced at the end of this article.
Foam wedges marketed as bass traps should be avoided because their performance is poor. I have measured the equivalent of many such products and the results are posted on my blog:
Trap placement
Both broadband and membrane traps work best in corners, but their placement requirements are a little different. Broadband traps require spacing out from the boundary to work best.
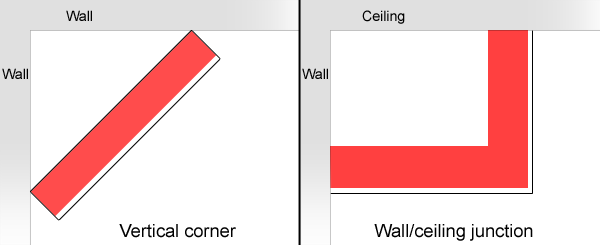
Figure 9. Bass trap placement for vertical corners (left) and bulkhead traps (right)
Membrane traps work best close to the boundary surface, and they also work well in vertical corners, bulkheads and behind furniture. The bulkhead trap could also be placed on the diagonal, which can be expected to yield a similar result with less material. The bulkhead shown is similar to those used in many home theatres, often without performing a bass trap function. A rectangular section trap such as this could also be used for cable runs and lighting. Some care is needed from a safety point of view where lighting and traps are combined.
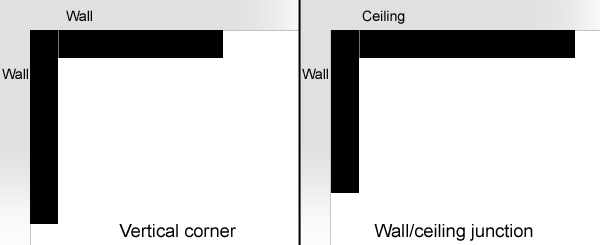
Figure 10. Membrane vertical corner (left) and bulkhead traps (right)
How much do you need?
While you certainly can kill a room with too much mid and high frequency absorption, this is unlikely to occur in the bass range. Aesthetics, practical limits and cost are limiting factors. As a general rule, it’s best to provide as much bass trapping as you can accommodate without giving up too much real estate.
1. Start with four broadband bass traps in vertical corners:
- 600 – 1200mm wide on the diagonal
- 100 – 200mm thick
- Rigid fiberglass with a density of 48 – 96 kg/m3
These traps can be expected to provide an adequate level of broadband absorption in most rooms. Difficult rooms will require more treatment but even rooms with good performance prior to treatment will benefit from further treatment.
2. Add broadband bulkhead traps:
- 300 – 900 mm in both width and depth
- 100 – 200 mm thick
- Rigid fiberglass with a density of 48 – 96 kg/m3
Rigid fibreglass is the standard material for broadband traps, but there are other materials that can also be used. Rockwool is a suitable alternative, along with high density insulation products with similar properties to fibreglass. The absorption coefficients in the 100 – 200 Hz range should provide an indication of performance.
3. Add membrane traps in other available corner areas:
- In the gap between furniture and the wall
- Along a wall where it meets the floor or ceiling
- Along one vertical corner surface where a door prevents the use of a broadband trap
Practical limits may dictate that broadband traps are replaced with membrane traps. In most rooms, it won’t be necessary to use all of the above traps. Most would be well served with four large vertical corner traps, but if they are made small (600mm wide) then additional traps may be needed. If uncertain, a waterfall plot can provide some feedback. When the decay is very even and ringing is well damped, further traps offer no real improvement.
Deciding when you have enough traps
The decay targets outlined in Part 1 provide some guidance. A waterfall plot is perhaps the most intuitive in terms of deciding when adequate absorption has been provided. The key thing to look for is how well modal ringing has been damped. As absorption increases, the in-room waterfall plot starts to look like a nearfield plot where all frequencies decay at the same rate.
Figure 11 illustrates with measurements before and after the addition of three vertical corner traps. This is a respectable improvement, with the two most prominent peaks around 44 and 75 Hz with serious ringing having been significantly damped.
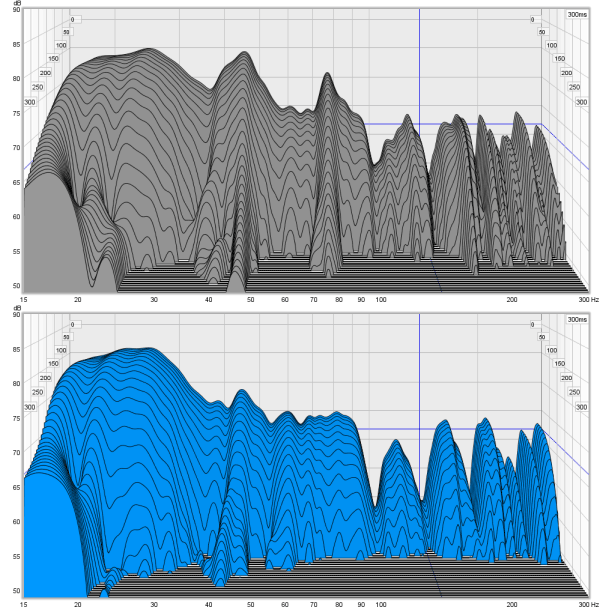
Figure 11. The result of three vertical corner traps. Grey: before. Blue: after.
While the ringing at 75 Hz has been completely damped, the 44 Hz mode still has some ringing, as highlighted in Figure 12. You can also see that the sharp tails from 100 – 300 Hz now decay at a more even rate. Some dips above 100 Hz are also introduced, but those were not caused by the traps and can safely be disregarded. The microphone had to be shifted and repositioned to put one of the traps in place. A slight shift in microphone position can have significant effects.
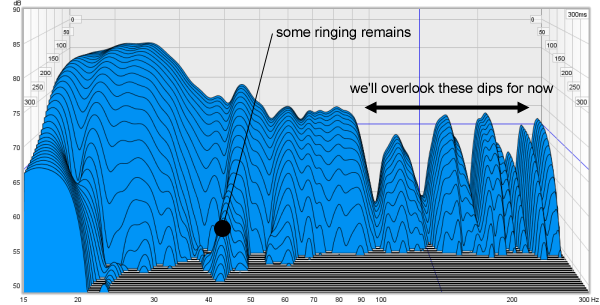
Figure 12. Some ringing remains
While the waterfall gives a more intuitive picture, the 2D decay plot allows us to more accurately assess how well damped the modes are with respect to our decay targets. Figure 13 shows the decay plot with the three vertical traps – a good result in terms of bass damping, but we are still short of the target. The two modes that were identified in the waterfall could use some more damping. Above 100 Hz we can also see some ringing remains, but if we increase the broadband absorption below 100 Hz, the ringing higher up should also be resolved. There are some significant dips seen here, but at this stage we aren’t concerned with those, because steps later in the process will address them.
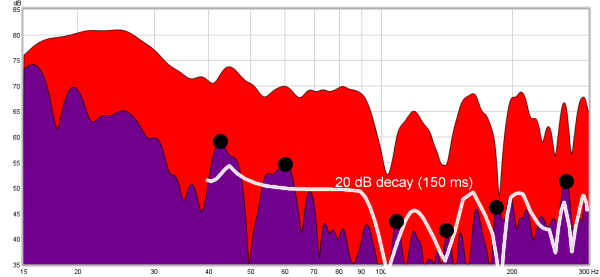
Figure 13. 2D decay plot for assessing decay targets
Using larger bass traps will effect an even greater improvement. In Figure 14 you can see that, with larger traps, the ringing at 44 and 60 Hz has been well damped so that it no longer stands out. The decay is quite consistent and the waterfall indicates that the traps are working well. Don’t expect to meet any targets at this stage of the process. The key thing to look for is the consistency of the decay. As the damping is increased, the waterfall will start to look smoother.
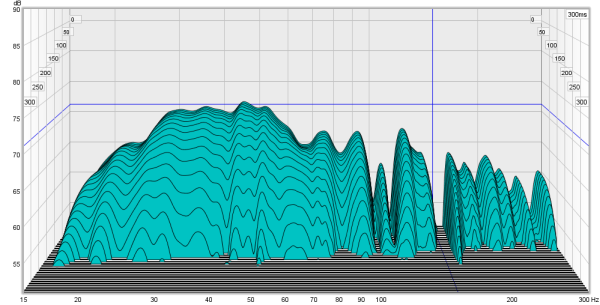
Figure 14. Three larger bass traps
You may notice that there is significant roll-off below 30 Hz. This is due to different EQ and bass management settings and isn’t related to the larger traps that were used. Likewise, the boosted bottom end in Figure 12 is not related to the influence of the traps at all.
If bigger traps are not an option, then an alternative would be to use some membrane traps to target the 40 – 65 Hz region. To improve the region above 100 Hz, additional broadband traps could be installed. Given that they would only need to be effective to 100 Hz, they could be smaller in size (bulkhead traps, for example).
The audibility of modal ringing
It should be noted that there is some debate regarding the audibility of modal ringing below 100 Hz. There are those who would argue that the attention paid to reducing decay below 100 Hz isn’t warranted. This line of thinking can lead to the omission of acoustic treatment, focusing instead on the other aspects that will be covered in Part 3 of this series. My experience indicates that the improvement in damping modal ringing acoustically is dramatic and that the same result can’t be achieved by other means. The improvement is so dramatic that I have noticed it while in another room with the door shut.
Further reading on bass traps
The BBC has published the results of considerable research into the design of membrane traps for use in their studios. This paper documents a modular membrane trap that works in the 50 – 100 Hz range:
This paper covers an absorber effective above 100 Hz:
The research shown in this report shows how a membrane trap can have some unwanted and unexpected effects:
This paper shows a design intended to be switched on and off. You probably don’t need that aspect, but it’s useful to have another design to consider:
The advantage in building the BBC traps is that their performance has been measured. Other designs are available, but many of them don’t have published measurements, so results will be unpredictable. Even a quick skim read through these papers will indicate why membrane traps aren’t my first recommendation. The details are critical and any variation from a known design can lead to poor results.
Coming up
The next step is to determine the optimum placement of speakers, the number of subs required and their best positions. All bass sources are then aligned in the time domain and crossover settings are chosen. EQ is applied to achieve maximum smoothness and the final response is adjusted to achieve the desired target curve. These steps will be covered in Part 3.


Paul,
Excellent article as usual. I especially like the way you point out figures and changes in the modal response which may not be obvious to those readers who are not used to waterfall plots. They explain so much more than typical frequency response curves which are only 1/2 the story. Keep it coming, looking very forward to Part 3!
Pretty definitive stuff, Paul. Very nice work. Thanks
Whatever happened to part 3? I keep checking back looking for the final chapter.
Although I must say I do enjoy the rest of the site too.
Wow huge improvement in Fig 14…would love to see what those traps look like or at least read their dimensions/materials.
Part 3!!
Part 3 is coming! There is a lot to cover so it’s taking a bit longer to get it done.
The traps used to get the result in Fig 14 are prototypes with a combination of foam and rigid fibreglass. My plans are a bit more elaborate than most. The room front corners will be taken up by 1.2m wide traps on a 30 degree angle, which will also serve as baffles for custom coaxial point source horn speakers that I’m working on. So those corners will house very large speakers while also damping the bass. There will also be a large trap in the rear left corner and a bulkhead trap, all of them with perforated membranes to avoid making the room dead.
You can see the speaker here:
http://redspade-audio.blogspot.com/2011/12/s2-synergy-bass.html
(The horn is a prototype but I plan to keep the active bass module). The horn shown is 1m wide and the bass module has a 60L sealed box for an 18″ woofer.
Regarding size, I suggest to make bass traps as big as you are happy with and distributed around the room as much as you can. If you use too few or make them to small you will see in the measurements that while they make an improvement, they only do part of what needs to be done. It is a shame to put in the effort and spend your money to build some nice looking panels that get you only part way there. For many a DIY bass trap may be their first DIY project and it’s a very worthwhile one.
Seeing a “trap” would be helpful for a lot of readers I think. I finally found a pic on one of the BBC links.
Now that I saw one, I don’t think I’m building these things and putting them in my listening room.
I’m also not feeling a “multiple-subs” configuration as I don’t even use one sub as it is. If you need a lot of subs, you really need some full range speakers and a decent listening environment.
Besides all that, whatever happened to just treating the walls in the listening room with cork, or acoustic foam, or lots of plants in the corner, etc. Is that not effective in the sub-100hz range?
Thanks and interesting article series!
The broadband traps I suggest here are a rectangular block of damping material wrapped in fabric. Simple to build and not difficult to visualise. I’ve shown diagrams because they are more instructive. If you want to see various images then do a Google image search and you will find many examples.
Damping modal ringing isn’t a matter for pot plants!
A decent listening room and an indecent one have this in common – they both benefit from all of the strategies in this guide. You could sell your home and buy another in the hope of getting better bass, if you are a real bass fanatic, only to find it needs about the same amount of work!
This guide presents the no compromise approach. If you want the best possible result you can’t leave anything out. It certainly isn’t for everyone, but if you find that you are working with limitations I would urge you to think creatively and do as much as you can. Many will see a big bass trap and say “there is no way my wife will agree to that, it’s not going to happen period!” Instead asking a different question sometimes helps. “How can I come up with a bass trap scheme that my wife will accept?” Then you start to think about different sizes, shapes and locations. A solution might occur that could have been missed.
Also regarding subs, leaving them out puts you at the mercy of the bass response where your mains are placed. Typically this will leave you with problems that can’t be fixed with EQ or treatment. If you eliminate subs and bass traps then you leave yourself very much at the mercy of the room with some potential to improve things a little with EQ.
It has never been as easy as it is now to get exceptional bass. Measurement tools are cheap, free information is readily accessible, EQ is now cheap and there are now more affordable quality subs than ever. For those willing to roll up their sleeves and learn new tricks, the possibility is there to do things much better than in the past.
Paul,
I think you summed it up well with this: “This guide presents the no compromise approach.”
Under that context, of course you can build bass traps and put subs all over the place. Kinda ironic adding subs *and* adding traps to kill bass [reflections] at the same time.
Also, how can this setup not be bass heavy, with so many subs?
Isn’t the goal a flat response?
Having lots of subs-n-traps to me sounds like a rumble room, not something flat.
But I digress because all these conversations are pretty meaningless without being able to hear your setup, or an example setup. I’m sure I would be like “holy crap, you’re right.”
One thing I would like your opinion on because I’m thinking about doing it. What kind of results can you obtain with the acoustic foam material on the walls? At least on the back wall where presumably most reflections are coming from.
Thanks!
Thanks!
Rob,
Bass traps stop the ringing so that the bass sounds much tighter and controlled. My initial impression when I started experimenting with traps was that it sounded like “outdoors bass.”
In reality, loading up a room with bass traps and many subs will not overload the room with bloated boomy bass. If you use quality subs and follow this process, you will get tight accurate bass, and you will also get the level balanced so that it sounds right to you.
What you hear in the bass region is strongly linked to what you can measure in the frequency and time domain. If you can get a 6″ woofer and an 18″ subwoofer to achieve similar measurements, they will most likely sound similar, but the bigger driver will retain good performance at higher levels. Now add bass traps and the bass will sound much tighter and controlled. It’s a bit like being in a room and the AC suddenly switches off – you didn’t notice it before but suddenly the room is silent! Now add multiple bass sources that have been placed with measurements. You start to fill in the dips and the response becomes progressively smoother as you add more. Now add EQ so that the dominant peaks are tamed. You now have a much smoother response than you could achieve with a pair of stereo speakers.
If you end up with a rumble room, then you have done something wrong!
Q: Which car travels faster on the highway, a Toyota or a Porshe?
A: It depends on the driver.
Put a sub in a system, crank it up and place it in a corner and you will probably get a boomy mess. Compared to a stand mount, you will probably find it a backward step. Why? The subwoofer illuminates all the bass problems that the stand mount was not able to fully reveal.
Acoustic foam placed flat on a wall will only absorb midrange and above as the effect is a function of the distance to the boundary as well as the foam thickness.
Thank you Paul for the information you provided on treatment. When it comes to dipole subwoofers have you done any experiment in setting phase? I have two dipole subs set up in a room with electrostatic speakers and was wondering if there is a starting point for setting the phase control in both subs? I am using high by-pass at 80 Hz from my main speakers. Thanks Sam
Paul,
I am about to build and the construction of the walls will be ICF. ICF means insulating concrete form and consists of a concrete core at least 100mm thick with a 50mm thick layer of polystyrene over this. On the internal wall sheetrock is fixed, either directly or to timber framing.
Can you suggest how a room with ICF walls might behave acoustically and whether direct fixing or framing is a better option?
Thanks
Mike
Mike,
The concrete provides a very solid boundary that should increase room gain and also mean room modes and boundary interference effects would be stronger than with a typical room with plasterboard/drywall on timber framing. This means more severe peaks and dips with a higher Q, less damped. This assumes opposing walls of this type of construction. Now the polystyrene could be thought of as adding some damping, probably acting very much like a pressure trap at the boundary, although the performance is a bit of an unknown. If plasterboard/drywall is fixed directly then it is also acting like a pressure trap. If you frame it up with timber then you have a bigger gap and a sound isolation advantage. I’d expect better performance with the framing added insulation included, ideally more dense than would be used for thermal reasons. Have a look at the articles on the Sound Proofing Company website (linked in my article above).
I believe the ideal construction would include a stud frame separated from the ICF wall then dual layers of plasterboard with green goo, fixed to horizontal furring channels. This is quite expensive, but it’s the way to go where you want the best sound isolation and bass damping. The construction shown in Figure 5 has a lower profile and would be cheaper.
Paul,
Thanks, I have had a quick look at the Sound Proofing website but I did not see ICF addressed specifically in relation to the effect of the polystyrene on bass damping. In my case (no neighbour on the other side of the wall!) I am more concerned with bass damping effects than sound proofing.
Are you saying that the standard steps taken to improve isolation will also improve bass damping equally?
Mike
Hi Paul,
Thank you for this guide — I look forward to part 3!
Quick question about broadband traps. If you’re building a bulkhead trap that is 600 mm in width and depth, how much of the space inside do you need to fill with fiberglass? Of course, the space between the fiberglass and the room boundary has a lot to do with its effectiveness, so you would start filling the trap with fiberglass from the bottom and from the side furthest from the vertical wall. How close do you have to get to the wall before you’re running into diminishing returns? Thanks.
Also, is there any reason to believe that bulkhead traps will be less effective than flat traps straddling vertical corners, assuming a similar spacing from the boundary? Bulkhead traps will be easier for me to integrate into my room so as to not chew up floor space. Perhaps the nature of the boundary would have something to do with it — I imagine bass traps placed along concrete walls (where there is a high percentage of energy reflected back into the room) might be more effective than traps placed along walls/ceilings with stud construction and an open room on the other side.
Thanks again.
Mike:
“Are you saying that the standard steps taken to improve isolation will also improve bass damping equally?”
It comes down to the proportions of absorption, reflection and transmission. I’d expect the above to improve damping by adding some absorption.
Bryan:
“If you’re building a bulkhead trap that is 600 mm in width and depth, how much of the space inside do you need to fill with fiberglass?”
If you completely fill the space with rigid fibreglass, that is going to be quite expensive on a large scale, with diminishing returns after the first 100 mm thickness. There isn’t a clearly defined point, so I leave it up to people to decide how thick to make their panels. Some people get a deal on a certain number of raw panels that might make it worth going a bit thicker. You won’t gain much from going thicker than 200 mm, so I wouldn’t go thicker unless you are using foam that you were able to obtain free, say recycled from an old couch or foam that often gets thrown out at a factory.
“Also, is there any reason to believe that bulkhead traps will be less effective than flat traps straddling vertical corners, assuming a similar spacing from the boundary?”
I haven’t tested the same trap in both locations, but if you find that bulkhead traps are much easier to live with then build them first. You might find they do the job just fine. In my room, vertical traps are easier and integrated with the room more readily. The advantage with vertical traps is that you are likely to be able to make them bigger. In my case, 1.2m isn’t a problem on the verticals, but I certainly couldn’t do a bulkhead trap that big. So a vertical is more likely in the practical sense to be able to get down lower. What you may find is that if you do both, you get more absorption above say 80 Hz, which is not a bad thing since our ears are more sensitive to time related issues higher up.
So my suggestion is start with the bulkhead traps and see where that gets you.
Nice guide, thanks 🙂
Although I have a question about the actual damping of the ringing in fig. 11. An accurate measure of damping at a specific frequency can only be seen if the SPL at the frequency is the same before and after. I did a mearurement in my own HT introducing a narrowband PEQ at the ringing frequency 33 Hz. And voila, the tail in the waterfall was clearly shorter. But when comparing the SPL at 33 Hz before and after PEQ was introduced, the damping was the same, appx. 25.
So the waterfall plot by itself does not give an exact picture of the damping results, one must also look at the SPL before and after at the ringing frequency.
Thanks … Terry, I like to look at waterfalls first because they are intuitive. Then I like to look at the 2D decay plot at 0 and 150 ms where you can look at how much decay has occurred relative to the original level. That avoids a certain visual trick where a frequency response peak may appear as ringing even where the actual decay is no different.
It’s ok, you can call me Terry 😉
Ah, the 2D decay plot. I must admit I havent given this very much attention, thanks for the tip.
You can se my measurement here http://avforum.no/forum/1810995-post438.html the red and green plots.
Paul,
I would like to ask your advice on some bass traps. I have 8 Roxul Safe and Sound 2’x4’ panels of insulation that are 3 inches thick (75mm) this is the only thing I could find locally to use. I have a large 4850 cu ft open room. I only have one corner that I can put a bass trap in and it’s behind a large computer desk with a hutch. My first question is will putting a corner trap behind the desk be beneficial, I was planning on a 6 inch (150mm) thick broadband trap with the edges angled to fit the corner and covered with cloth which will use 4 of the panels. For the next two I was going to make two panels with 1”x2” frame behind the panels covered with cloth mounted on the wall low close to the floor between the main speakers or angled between the floor and wall, I know they are thinner than the 4” minimum but I am trying to maximize the area covered. Or, would it be better to place them behind the couch on the back wall or double them up to make one 6” panel? My last question is about Membrane traps. I have seen drawings of traps with 1” insulation and ¼” plywood on front with a small air gap in front and a 2” air space behind the insulation and sealed I’m sure you’ve seen this same drawing. The BBC article you referenced didn’t show any air gap, is this air gap needed? How would you recommend I make a membrane trap using the Roxul that I have or should I make two more panels with the 1’x2” frames? These will be placed vertically on the wall in two of the corners that I cannot put a full corner broadband trap in. Any help you can give will be greatly appreciated, great articles and I look forward to reading Part 3.
Larry
Larry, are you able to do bulkhead traps?
Without seeing your room, my initial thought would be to see if you can do this:
1. Start with the vertical broadband trap you mentioned you can do, on the diagonal.
2. Add bulkhead traps, also broadband.
3. Add pressure traps to vertical corners which are low profile.
Before doing this, you really need to do measurements. Big open rooms are sometimes lucky in that they not only allow space for traps (potentially), but they can also be inherently lossy, resulting in a lesser need for traps. Sometimes when measuring such a room you find that the decay in certain regions is fine and that smaller areas can be targeted with pressure traps.
From your description it sounds like you are planning to install some midrange absorbers, hoping they will work as bass traps. A pressure trap is a sealed box with fibreglass inside to increase the bandwidth. Take away the membrane and it becomes a midrange abosrber, useless as a bass trap. So you either need broadband traps with space between them and the wall, or pressure traps which can be low profile. If you build a pressure trap and make it thinner, the results are unknown. If going to the effort and expense, I would follow a particular design.
Paul thank you for your response. I have done measurements and thanks to your guide I have an idea of how to interpret them. I believe I have sever modal ringing from 10Hz to 75Hz much greater than 300ms, it does decrease some from about 30Hz up. I couldn’t figure out how to post the waterfall graph here, or a drawing of my room. I can PM it to you if you would like on AVSforum.
I can do bulkhead traps, will one 75mm thick panel of the Roxul work as a bulkhead trap or should I double it to 150mm with the sides angled like I’m doing for the corner trap? I would like to do several pressure traps I’m just not sure how to design them. This is what I’m thinking, an air tight box 89mm deep with one 75mm panel of Roxul mounted to the rear leaving a 14mm air gap in the front and using 6mm thick plywood for the front and back. Do you think this would make a good pressure trap in the lower bass range? I will place them in the vertical corners that have doors to one side.
Larry
Thanks for a great series of articles. The BBC link to “BBC RD 1992-10 – The design of a modular sound absorber for very low frequencies” has changed to http://downloads.bbc.co.uk/rd/pubs/reports/1992-10.pdf, I haven’t checked the others.
Thanks for the note, Mark, I’ve corrected the link (the rest seem OK).
Is it the A11 that you have build and put in the corners? It would be nice with some pictures of the traps you have build and maybe some DIY guides.
I have looked at the GIK Trip Trap corner bass traps but there are to expensive for my budget.
The I have Googled a lot but 99% of all corner bass traps is a stack of massive rockwool in the corner.
Do some of the readers of this excellent article series know about a DIY corner bass trap? What about a follow up article showing how to implement all this for real, pictures please.
Thanks for you writing about miniDSP and diy audio its the best. You should take the articles and make them into a book, I would gladly pay for more of the same.
Hi Martin,
I use DIY bass traps in my room. A broadband bass trap is nothing more than a rigid fibreglass panel (or equivalent) placed as shown. Everything you add to the panel is simply there to make it look better and remain in place. Unless of course you use a reflective membrane. You may like to check out the Gearslutz forum for some examples of DIY traps.
Articles on MiniDSP and DIY speakers were most likely done by John who is the editor of Hifi Zine.